CREATION AND POPULATION OF A FULLY FUNCTIONAL SMART-TERRAIN
In this tutorial, we’ll be establishing a stalker base with weapon restrictions, weapon cleaning facilities, emission zones, NPC immortality zones, sleep zones, actor teleportation points, exclusive tasks for NPCs, and unique NPC roles (trader, medic, technician, leader, a specific NPC providing quests). Additionally, we’ll set up a base for an opposing faction.
All of these actions will take place in the swamp location from the “Clear Sky” game.
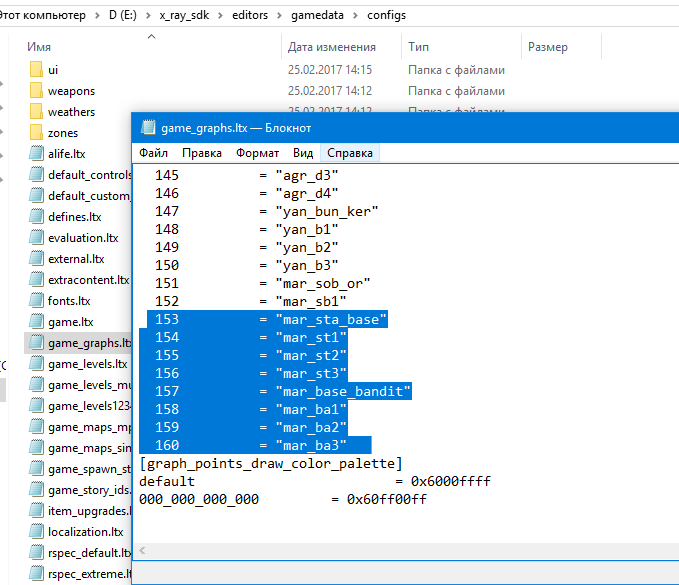
To begin, register your smart-terrains in the game_graphs.ltx file located at the following path: x_ray_sdk\editors\gamedata\configs
Here are the names I’ve assigned to my smart-terrains for bases and simulation:
153 = “mar_sta_base” - Stalker base 154 = “mar_st1” - for simulation and defense 155 = “mar_st2” - for simulation and defense 156 = “mar_st3” - for simulation and defense 157 = “mar_base_bandit” - Bandit base 158 = “mar_ba1” - for simulation and defense 159 = “mar_ba2” - for simulation and defense 160 = “mar_ba3” - for simulation and defense
Refer to the screenshot for further clarification.
Next, these smart-terrain names must be added to the same file, but this time within your mod’s game directory folder.
After entering the smart-terrain names, save the file, launch the level editor, and open the location you intend to work on.
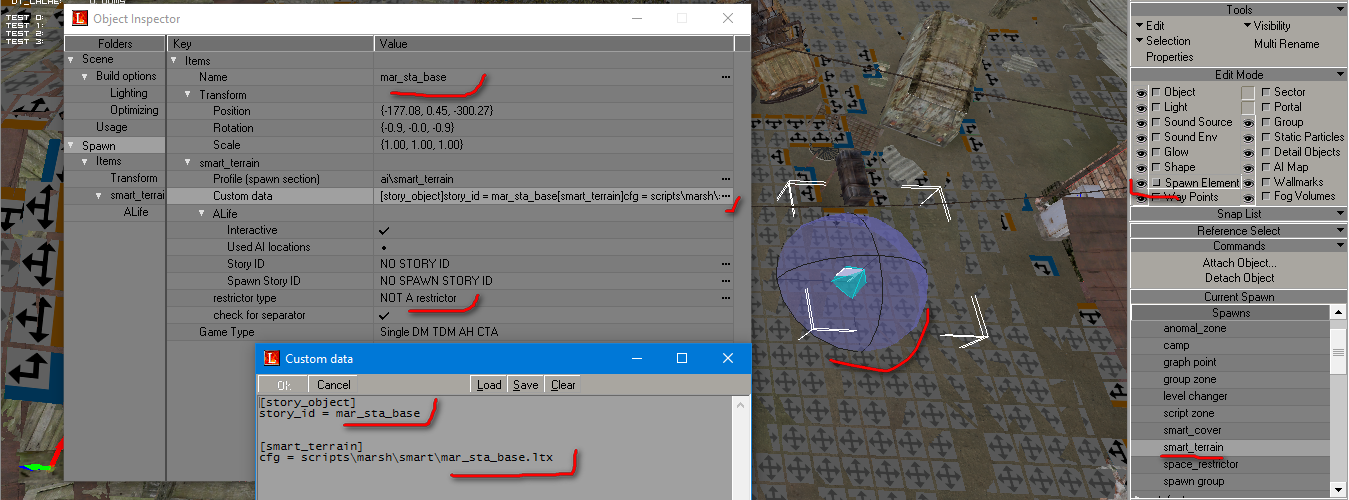
For instance, I open the swamp location (marsh). In the “Spawn” element section, choose the (AI) option, click on the smart-terrain using the “Add” function, and place it in the location, specifically at the center of the stalker base. This ensures that the base is accurately displayed at the center of the map.
Enter the smart terrain name: mar_sta_base.
In the custom data section, provide a reference to the logic file for this smart-terrain.
[story_object] story_id = mar_sta_base [smart_terrain] cfg = scripts\marsh\smart\mar_sta_base.ltx
Also, set the NOT Restrictor.
Refer to the screenshot for clarification.
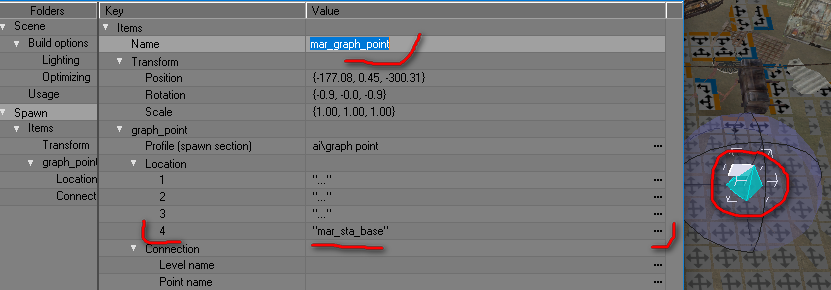
Proceed by positioning a graph point at the center of the smart-terrain, assign it the name “mar_graph_point,” and link it to the smart-terrain.
Make sure to establish the connection in section number 4.
Refer to the screenshot for visual guidance.
Having established the smart-terrain and graph point, the next step is to strategically place additional simple graph points throughout the base area. Create a restrictor and extend its dimensions significantly to cover the entire base and its surrounding territory. Provide it with the name:
Name: mar_sta_base_sr_no_assault
Additionally, configure it as a NOT Restrictor.
Refer to the screenshot for visual assistance.

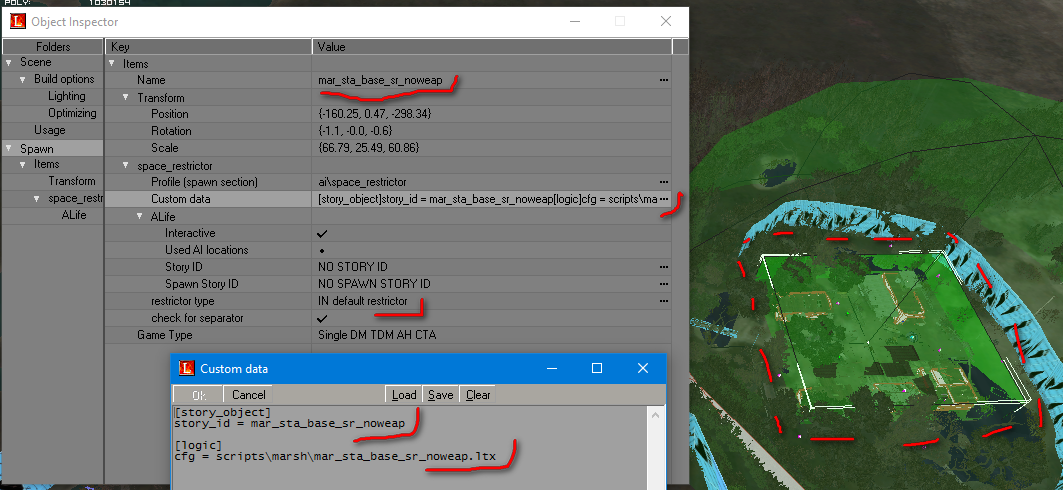
Let’s implement a restrictor that disarms the actor upon entry. Create a cube-shaped restrictor, adjusting its size and height to cover the area of the stalker base. Assign the name:
Name: mar_sta_base_sr_noweap
Custom data: [story_object] story_id = mar_sta_base_sr_noweap
[logic] cfg = scripts\marsh\mar_sta_base_sr_noweap.ltx
Additionally, designate it as the “In Default” restrictor.
Refer to the screenshot for further clarification.
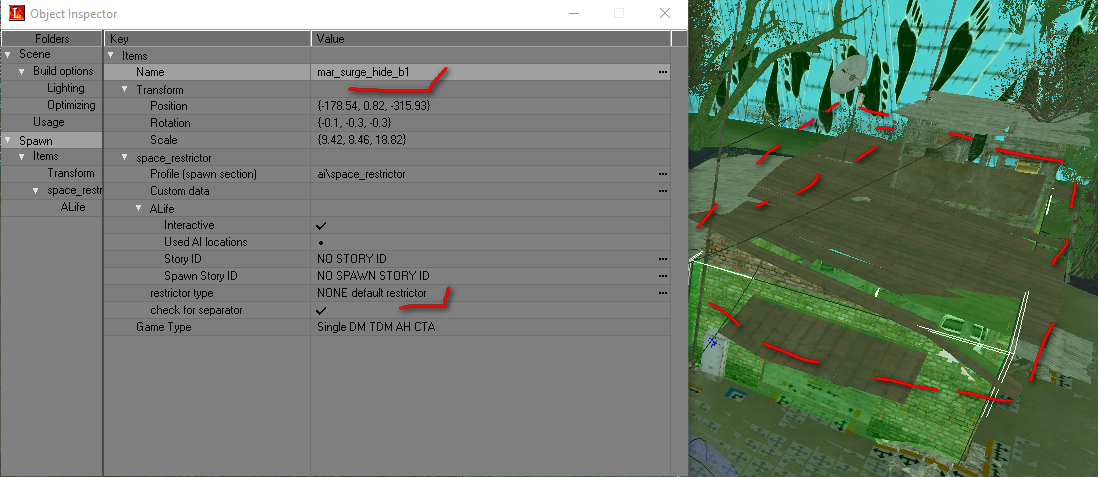
Now, let’s create another restrictor and configure it to function as an emission zone. Provide it with the name:
Name: mar_surge_hide_b1
Ensure it is set as a NON-Default restrictor.
Refer to the screenshot for visual guidance.
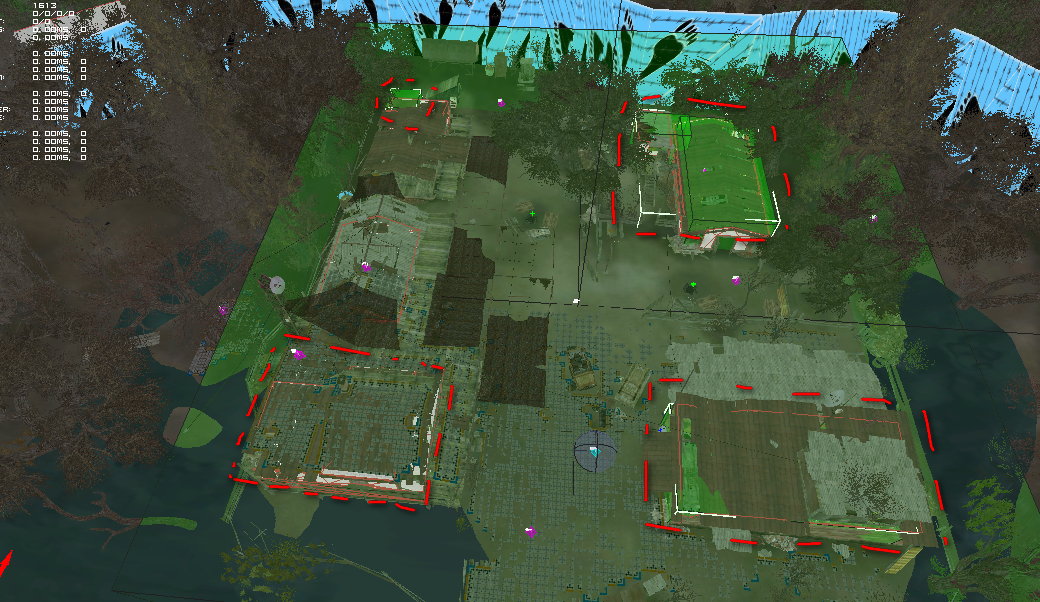
While the first emission zone has been successfully established, considering the numerous buildings within the base, creating a single, large zone seems impractical. Emission zones are typically configured within buildings or tunnels rather than outdoors. Let’s proceed to create three additional zones with the following names:
mar_surge_hide_b2 mar_surge_hide_b3 mar_surge_hide_b4
Ensure that all of these are configured as NON-Default restrictors.
I’ve positioned four emission zones within a single base, strategically placing them in areas where the leader, technician, trader, and medic are stationed.
Refer to the screenshot for reference.
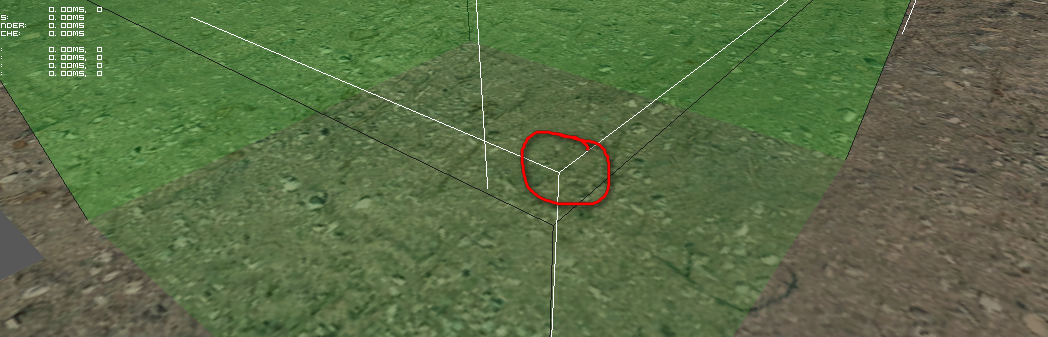
ATTENTION: In case you encounter an error while creating a restrictor, please consult the screenshot.
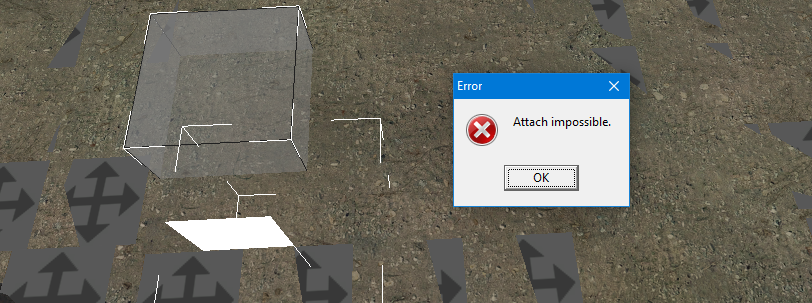
In case you are following the steps correctly and encounter this error, approach the shape closely with the camera and click the mouse on the corner of the shape. This action will create the restrictor. Refer to the screenshot for visual assistance.
Now, add a restrictor with dimensions resembling the weapon cleaning zone and give it a name:
Name: mar_sta_base_sr_light
Custom data: [logic] cfg = scripts\marsh\mar_sta_base_sr_light.ltx
Additionally, configure it as a NON-Default restrictor.
Refer to the screenshot for visual guidance.
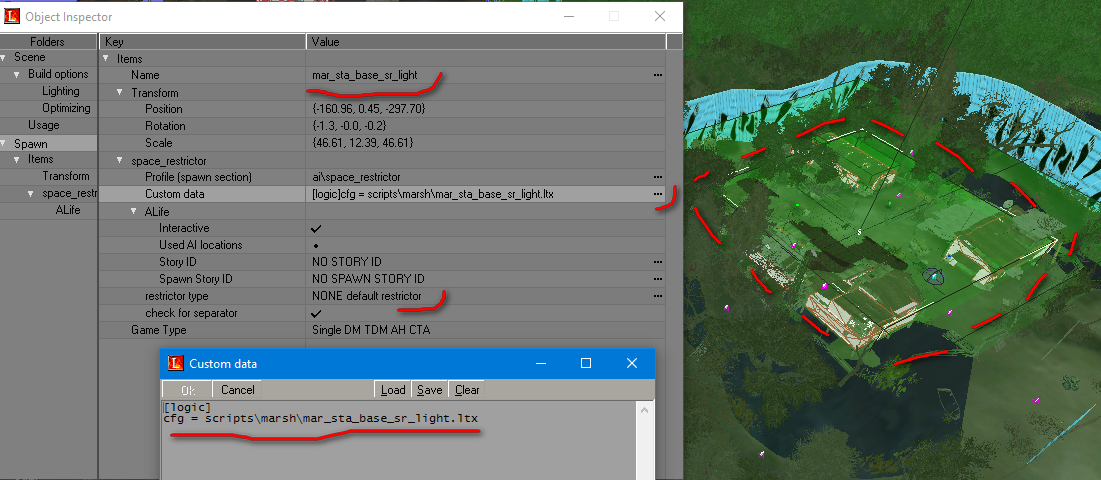
This restrictor deactivates flashlights for NPCs sitting by the campfire or standing at the bar counter during the night, where there is illumination, etc.
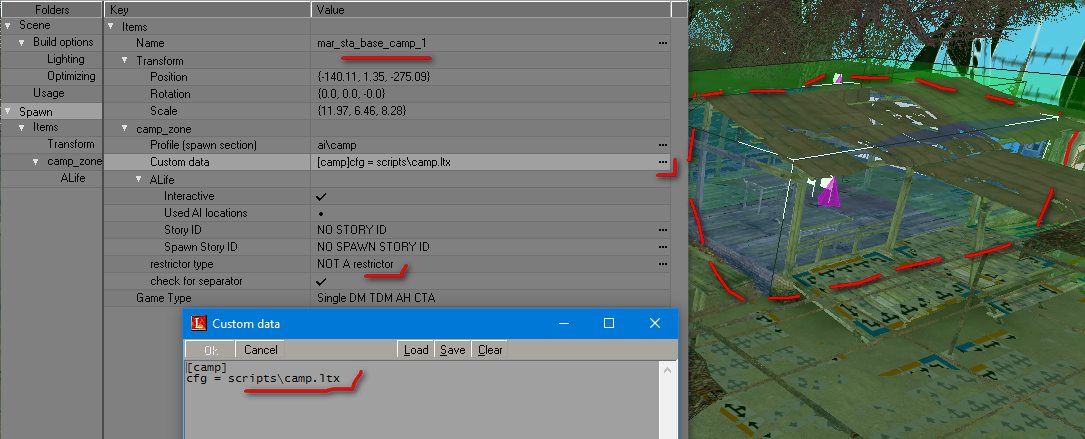
Now, let’s establish camp zones for socializing, sharing jokes, dining, drinking, and warming up by the campfire in good company.
In the spawn element section, select the camp option and place it in areas with campfires, bar counters, or generally communal spaces.
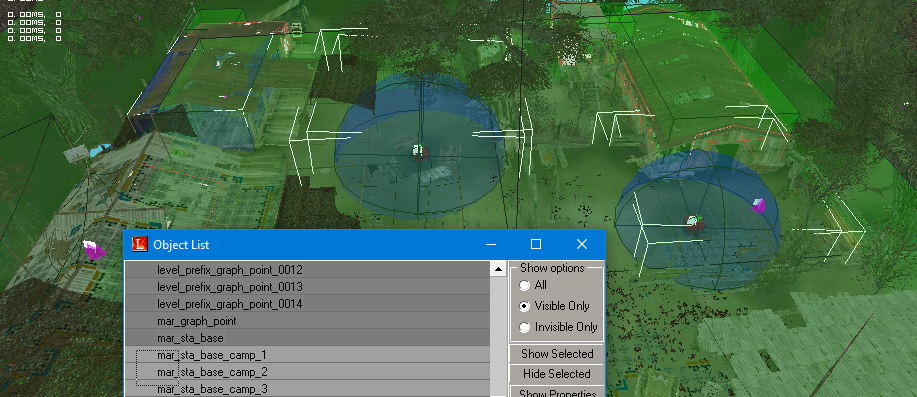
For my base, I’ve designated three camp zones and named them:
mar_sta_base_camp_1 mar_sta_base_camp_2 mar_sta_base_camp_3 In the custom data of each smart-terrain, include a reference to the logic file.
[camp] cfg = scripts\camp.ltx
Additionally, ensure they are set as NOT Restrictors.
Refer to the screenshot for visual guidance.
Proceed to set up as many camp zones as required, and remember to number them accordingly.
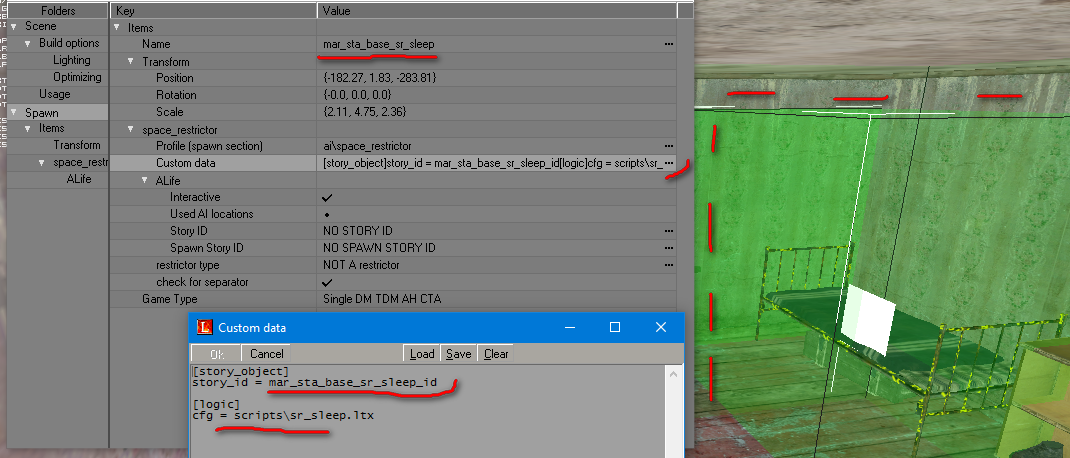
Next, establish a restrictor for the sleep zone. Use the camera to locate an appropriate sleeping area, position the restrictor, and expand it vertically above the actor’s height and horizontally to fully encompass the actor. Assign the name:
Name: mar_sta_base_sr_sleep
Custom data: [story_object] story_id = mar_sta_base_sr_sleep_id
[logic] cfg = scripts\sr_sleep.ltx
Additionally, ensure it is configured as a NOT Restrictor.
Refer to the screenshot for visual guidance.
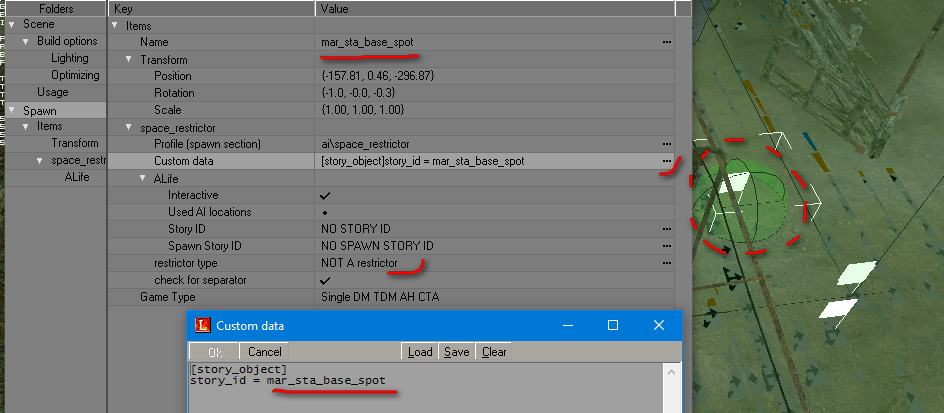
Now, install a small restrictor to indicate the base on the global map, positioning it at the center of the base.
Name: mar_sta_base_spot
Custom data: [story_object] story_id = mar_sta_base_spot
Additionally, configure it as a NOT Restrictor.
Refer to the screenshot for visual guidance.
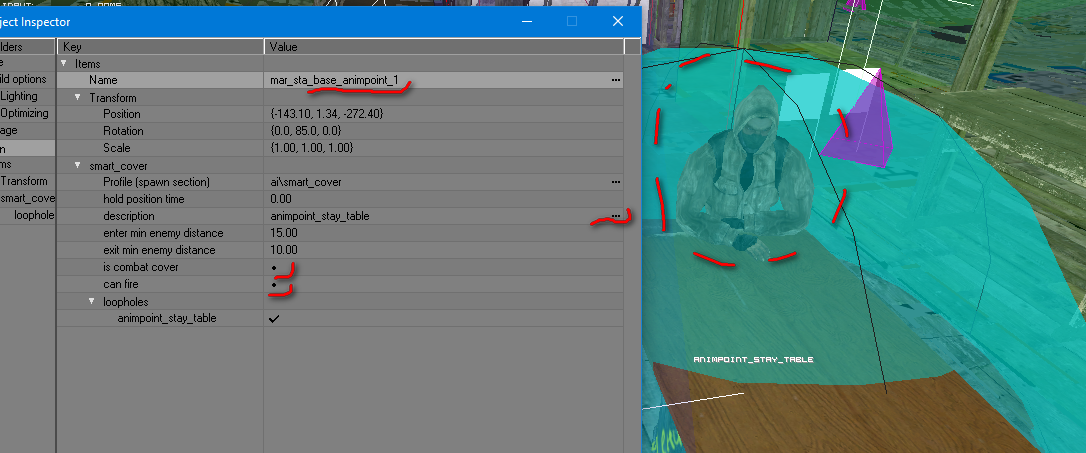
Now, strategically position smart-covers across the base area for simulation squads that will be directed to these smart points.
Start with the first smart-cover and name it:
Name: mar_sta_base_animpoint_1
Choose the animation, for example, standing at the bar counter, or according to your preference. Remember to uncheck the boxes in the “is combat cover” and “can fire” sections.
Refer to the screenshot for visual guidance.
Now, let’s strategically position these in areas where there are camp zones by the campfire or simply within the base territory.
Install the second one and configure it similarly to the first, choosing the appropriate animation and assigning a name.
Name: mar_sta_base_animpoint_2
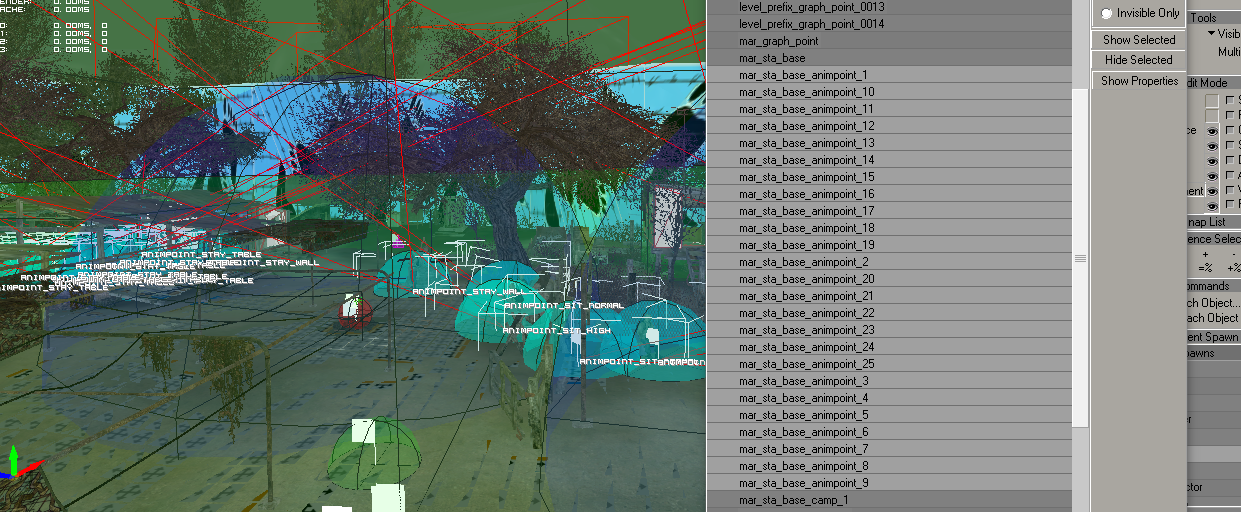
Continue this process, adhering to the numbering sequence: 3, 4, 5, and so forth. For a large base, it’s recommended to use a sufficient number of smart-covers. This ensures that when the simulation squad arrives, the workspaces are occupied, and they default to sitting, looking down, standing with their weapons piled up, or huddling in a corner.
Here’s a list of my smart-covers, and I’ll be adding even more.
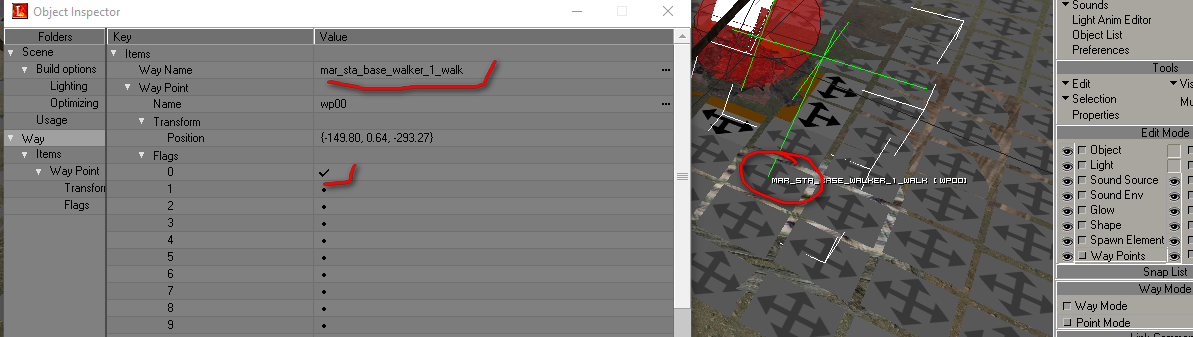
Next, we’ll strategically place waypoints for simulation squads. Some points are intended for gatherings by the campfire, while others are designated with paths for movement and corresponding animations at the path points.
In the enabled “waypoint” section, click on the “add” button and position the initial waypoint by the campfire.
For each workstation, establish two points: “walk” and “look.”
Start by setting the “walk” point and assigning a name.
Name: mar_sta_base_walker_1_walk
Make sure the checkbox is set to zero.
Refer to the screenshot for visual guidance.
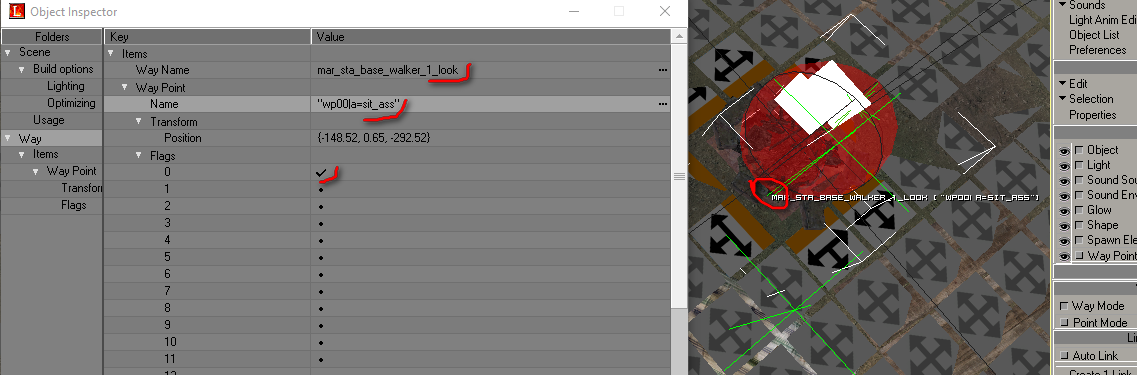
Proceed to position the “look” point at the center of the campfire and specify a name along with the animation.
Name: mar_sta_base_walker_1_look
| Animation: “wp00 | a=sit_ass” |
Ensure that the checkbox is set to zero.
Refer to the screenshot for visual guidance.
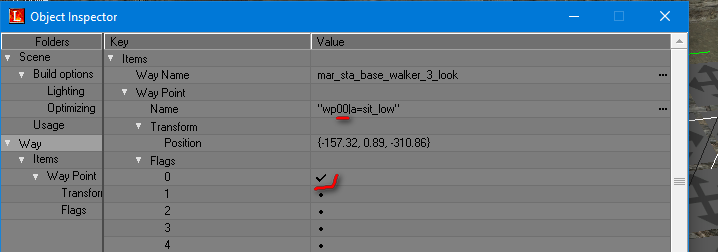
This is the method for strategically placing waypoints across the base area while maintaining proper numbering and assigning corresponding animations:
mar_sta_base_walker_2_look mar_sta_base_walker_2_walk And so forth. Animations for the waypoints:
“wp00|a=sneak” —— crouch halfway with the weapon aimed “wp00|a=binocular” —— looks through binoculars “wp00|a=hide_na” —— crouch halfway with the weapon aimed “wp00|a=guard_chasovoy” —— stands with hand to the forehead, looks into the distance, weapon on back, lowers weapon and holds it in hand “wp00|a=ward” —— stands with legs apart, hands behind the back “wp00|a=threat_na” —— sniper stands with the weapon aimed “wp00|sig=path_end” —— simply stands with the weapon in hand “wp00|a=sit_ass” —— sits on the ground “wp00|a=sit_knee” —— sits on knees “wp00|a=sit_low” ————- The list of animations is extensive.
NOTE: If you place points without a path, do not change the animation numbering, and set the checkbox to zero.
Refer to the screenshot for visual guidance.
Now that the waypoints are in place.
Let’s compile the spawn using the “Make Game” function and a batch file. Copy the spawn file from the SDK and paste it into your mod.
After building the spawn, proceed to register the location and specify the stalker squad for spawning in this smart terrain.
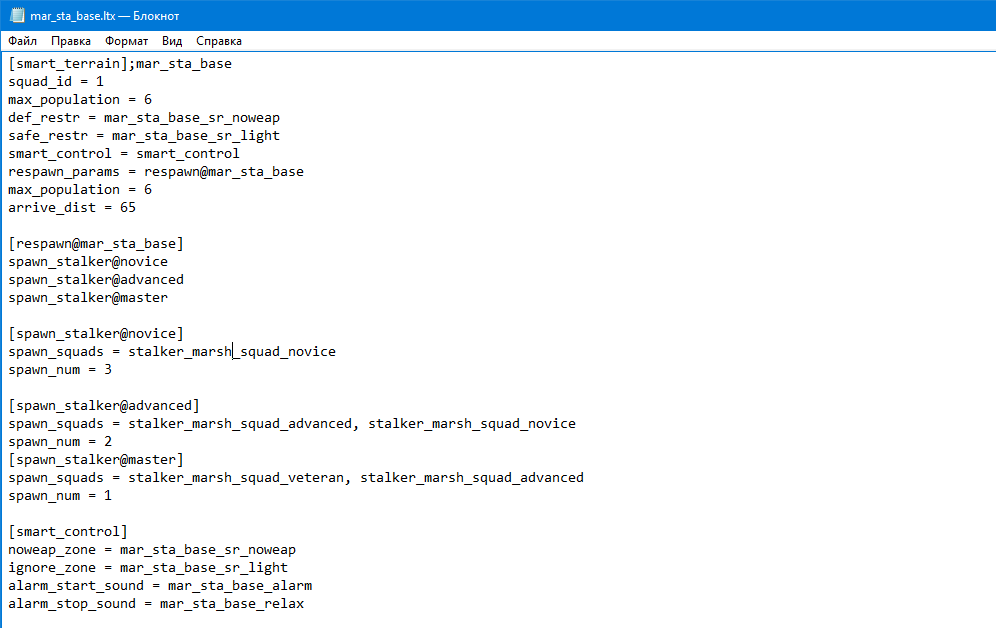
Navigate to the smart terrain folder at S.T.A.L.K.E.R - Call Of Pripyat\gamedata\configs\scripts\marsh\smart. Create a file named mar_sta_base.ltx, open it, and define the logic for the smart terrain.
[smart_terrain];mar_sta_base squad_id = 1 max_population = 6 def_restr = mar_sta_base_sr_noweap safe_restr = mar_sta_base_sr_light smart_control = smart_control respawn_params = respawn@mar_sta_base max_population = 6 arrive_dist = 65
[respawn@mar_sta_base] spawn_stalker@novice spawn_stalker@advanced spawn_stalker@master
[spawn_stalker@novice] spawn_squads = stalker_marsh_squad_novice spawn_num = 3
[spawn_stalker@advanced] spawn_squads = stalker_marsh_squad_advanced, stalker_marsh_squad_novice spawn_num = 2
[spawn_stalker@master] spawn_squads = stalker_marsh_squad_veteran, stalker_marsh_squad_advanced spawn_num = 1
[smart_control] noweap_zone = mar_sta_base_sr_noweap ignore_zone = mar_sta_base_sr_light alarm_start_sound = mar_sta_base_alarm alarm_stop_sound = mar_sta_base_relax
Refer to the screenshot for visual guidance.
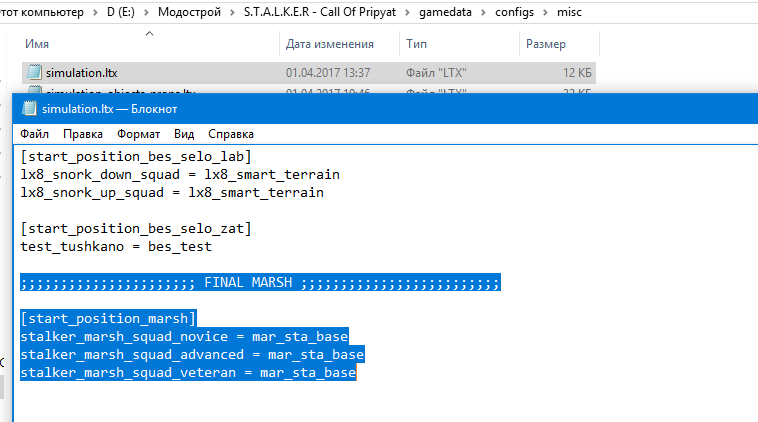
After configuring, save and close. Now, navigate to the “misc” folder located at S.T.A.L.K.E.R - Call Of Pripyat\gamedata\configs\misc. Paste the files copied from the original game.
Files to paste:
simulation.ltx simulation_objects_props.ltx smart_terrain_masks.ltx squad_descr.ltx squad_descr_marsh.ltx (copy the Zaton version and rename it to your location’s name) Open the simulation.ltx file. At the end, add the section for your location:
;;;;;;;;;;;;;;;;;;;;;; FINAL MARSH ;;;;;;;;;;;;;;;;;;;;;;;;; [start_position_marsh] stalker_marsh_squad_novice = mar_sta_base stalker_marsh_squad_advanced = mar_sta_base stalker_marsh_squad_veteran = mar_sta_base
Write three squads: NOVICES, ADVANCED, and VETERANS. Refer to the screenshot for visual guidance.
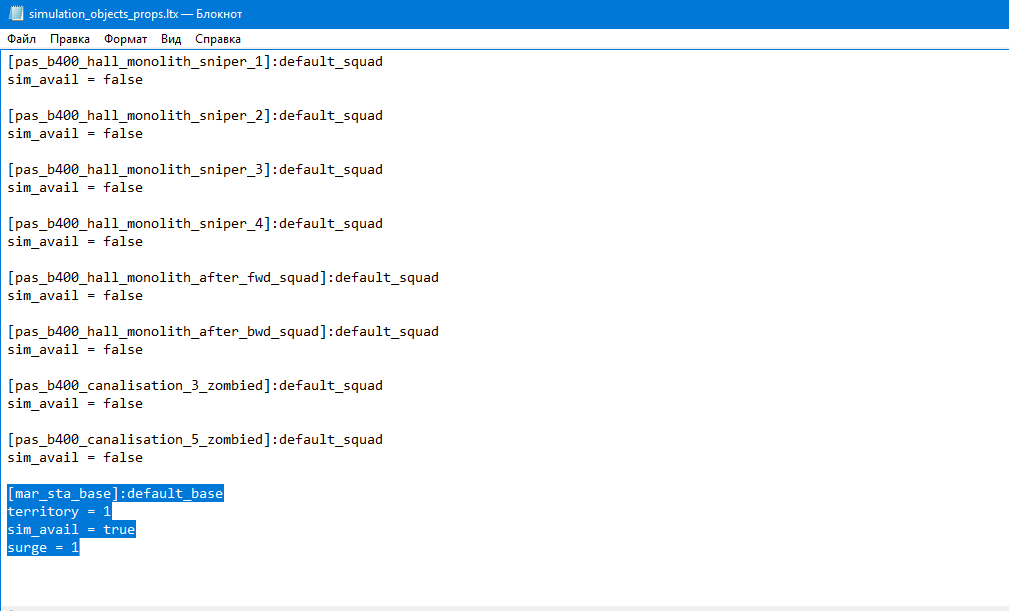
After making the configurations, save and open the file simulation_objects_props.ltx. Specify our smart terrain as the base.
territory = 1 sim_avail = true surge = 4
See the screenshot for reference.
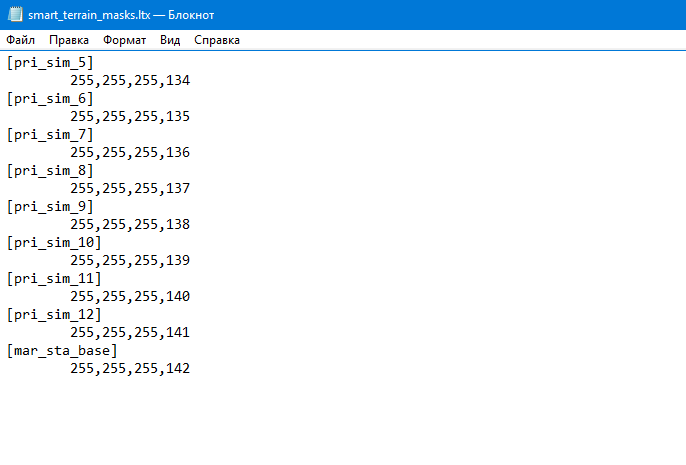
Save and close. Next, open the file smart_terrain_masks.ltx and register our smart terrain.
mar_sta_base 255,255,255,142 – maintain the numbering
See the screenshot for reference.
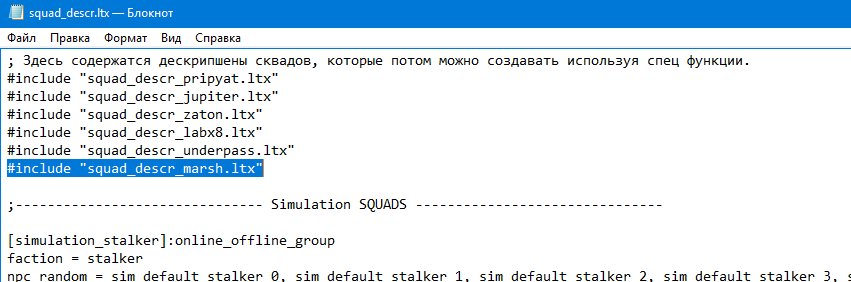
Save and close. Next, open the file squad_descr.ltx and include the file with the name of our location.
#include “squad_descr_marsh.ltx”
See the screenshot for reference.
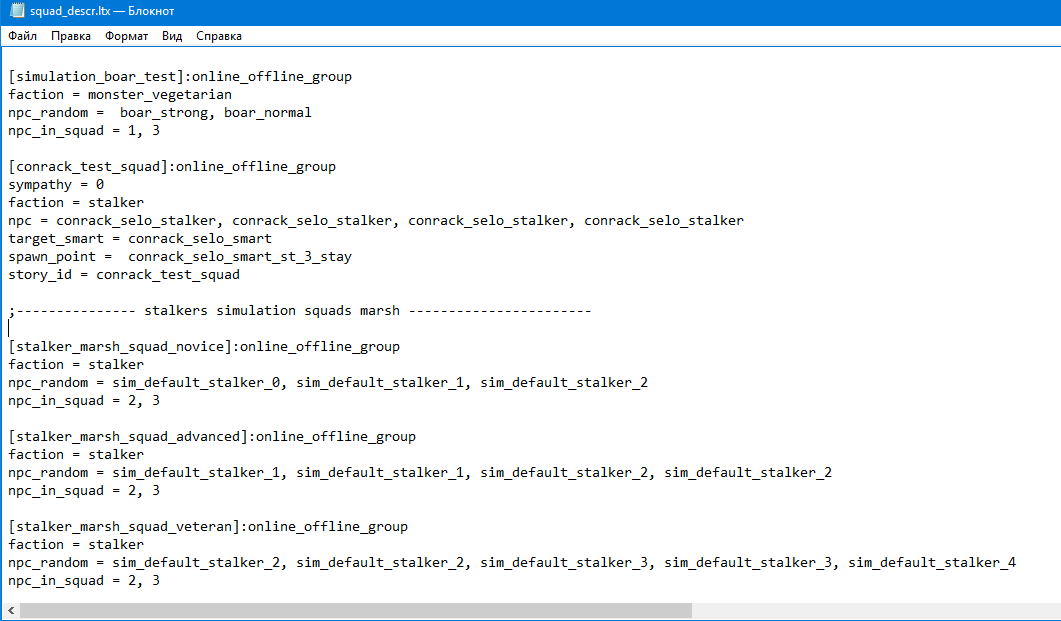
Now, in the same file, at the bottom, add a section for our simulation squads.
;————— stalkers simulation squads marsh ———————–
faction = stalker npc_random = sim_default_stalker_0, sim_default_stalker_1, sim_default_stalker_2 npc_in_squad = 2, 3
faction = stalker npc_random = sim_default_stalker_1, sim_default_stalker_1, sim_default_stalker_2, sim_default_stalker_2 npc_in_squad = 2, 3
faction = stalker npc_random = sim_default_stalker_2, sim_default_stalker_2, sim_default_stalker_3, sim_default_stalker_3, sim_default_stalker_4 npc_in_squad = 2, 3
See the screenshot for reference.
Save and close. Now, open the file squad_descr_marsh.ltx. Ensure that this file is empty, and remove any Zaton-related content.
Next, register the location name in the scripts by opening the files:
sim_board.script (copy from the original game) smart_terrain.script (copy from the original game) These files should be located at: S.T.A.L.K.E.R - Call Of Pripyat\gamedata\scripts, inside the “scripts” folder.
Open the file sim_board.script and write the location name. Refer to the screenshot for guidance.
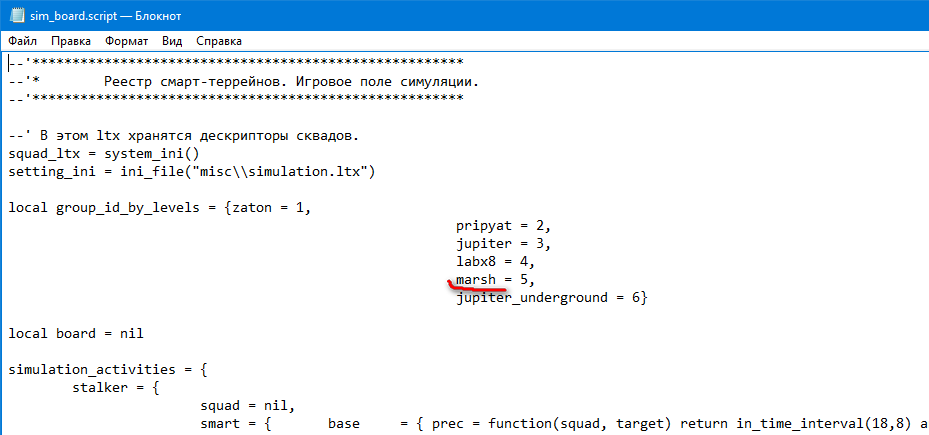
Save and close.
Open the file smart_terrain.script, and in the three instances, write the location name. Refer to the screenshots for guidance.
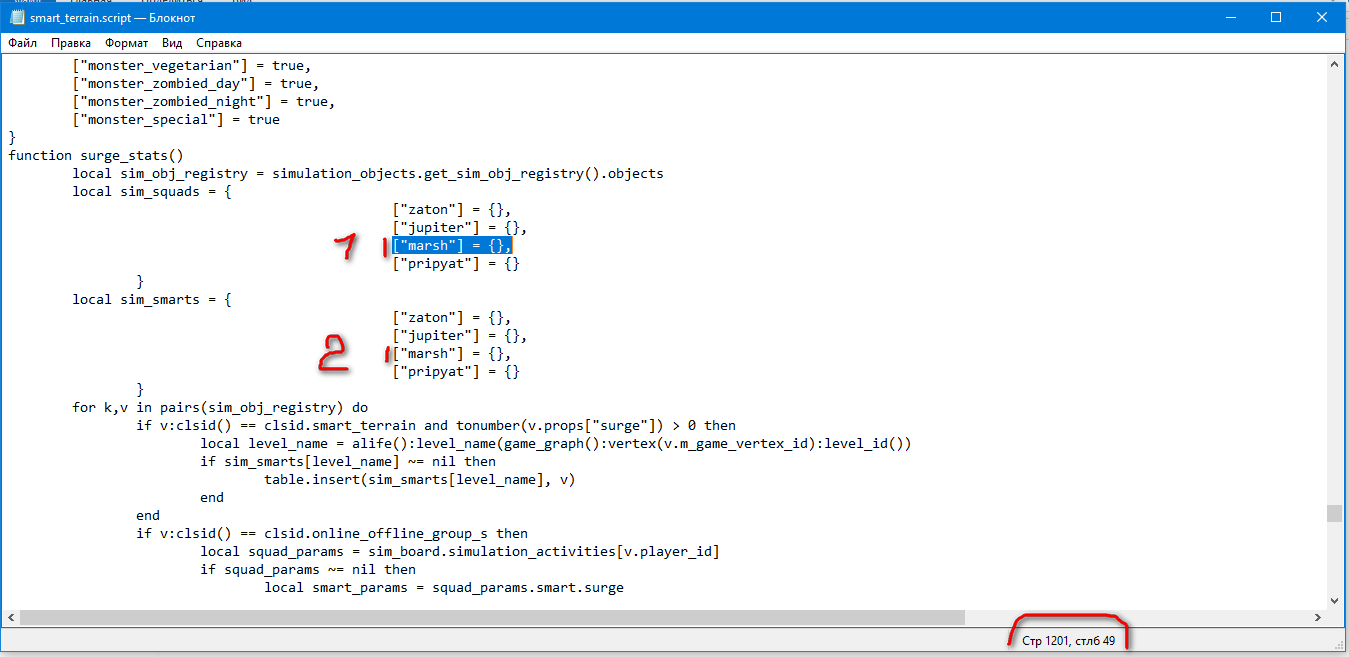
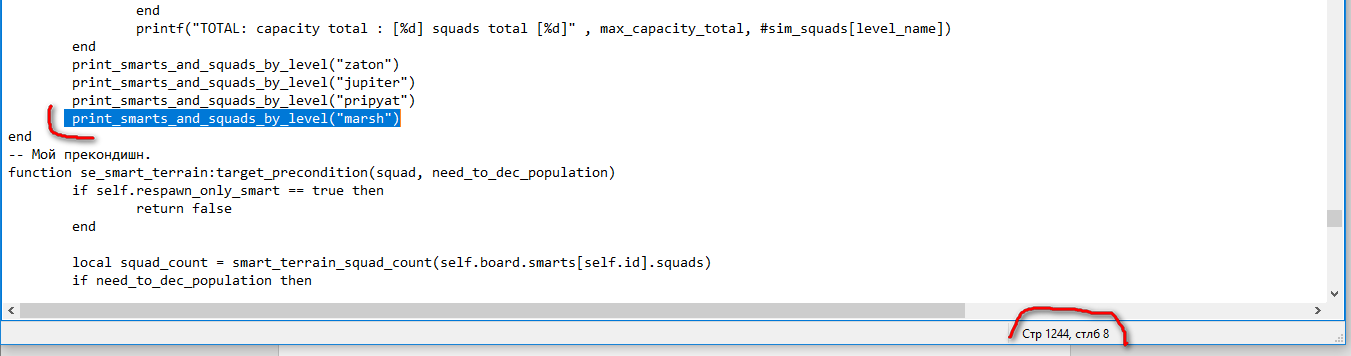
Applied the changes, saved, and closed the file.
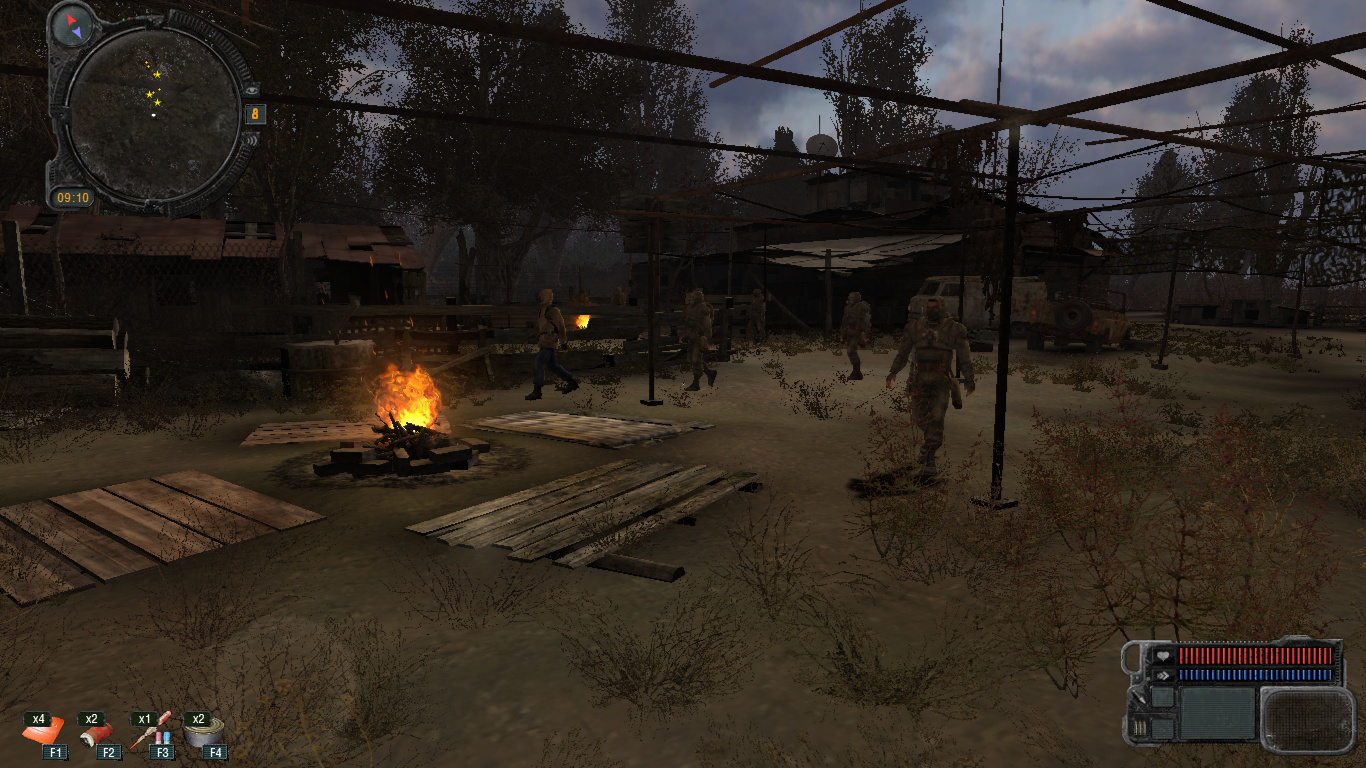
NOW I WILL VERIFY IN THE GAME. I reassembled the spawn, compiled it, and replaced the spawn file from the SDK in the game.
Verified, and the game started without any issues.
Now, let’s write, register, and create all the files for our restrictors, weapon cleaning zones, surge zones, camp zones, etc.
Firstly, open the “scripts” folder located at S.T.A.L.K.E.R - Call Of Pripyat\gamedata\scripts, and open the file surge_manager.script (copy it from the original game and paste it into your mod).
Open the file and write sections with the name of our location.
- Locate the following section:
function CSurgeManager:initialize()

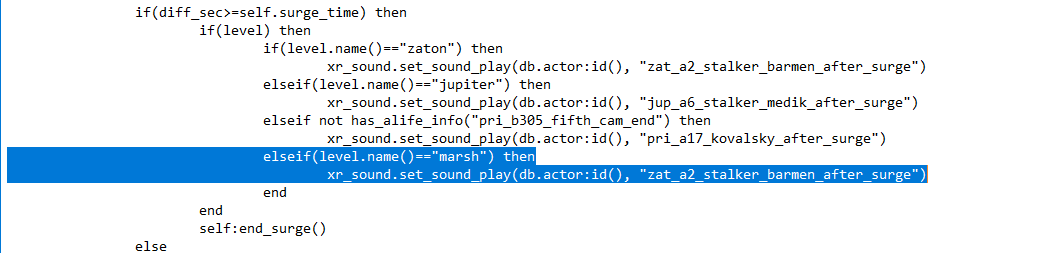
- Locate this section:
if(diff_sec>=self.surge_time)then. Copy the Jupiter part and replace it with the name of your location. This way, when a surge occurs, the trader’s voice will announce it, advising everyone to take cover.
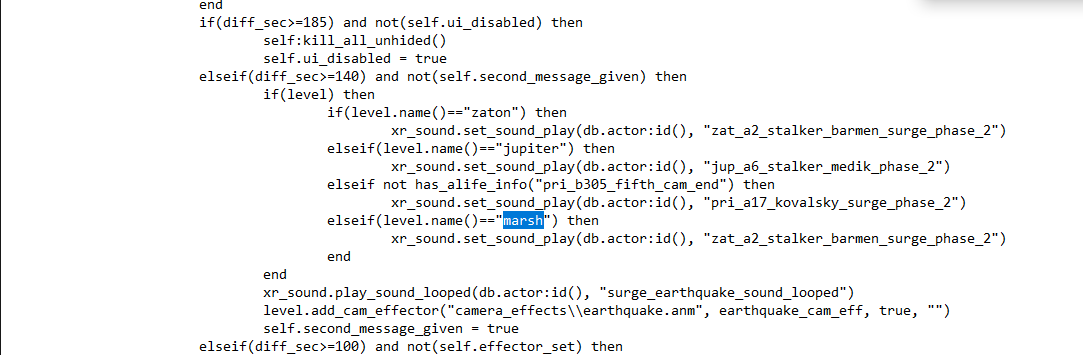
- Locate the section:
if(diff_sec>=185) and not(self.ui_disabled) then, copy the Jupiter part, and substitute the name of your location. This way, when the emission ends, the trader’s voice will announce it, advising everyone to return to their posts.
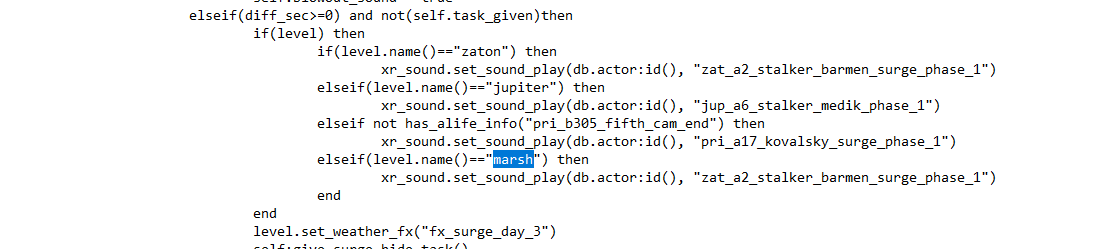
- Locate the section:
elseif(diff_sec>=0) and not(self.task_given) then, copy the corresponding part from Jupiter, and replace it with the name of your location. This way, when the emission begins, the trader will give the task to the technician to turn on the emission protection system.
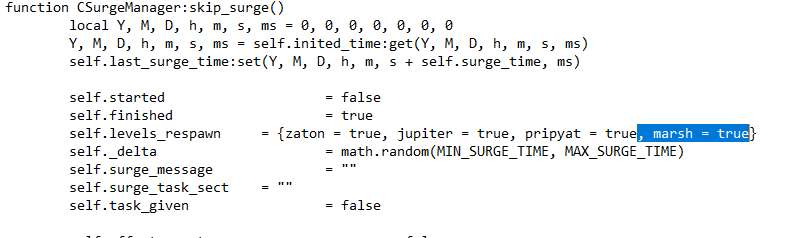
- Locate the section:
function CSurgeManager:skip_surge()and insert the name of your location.
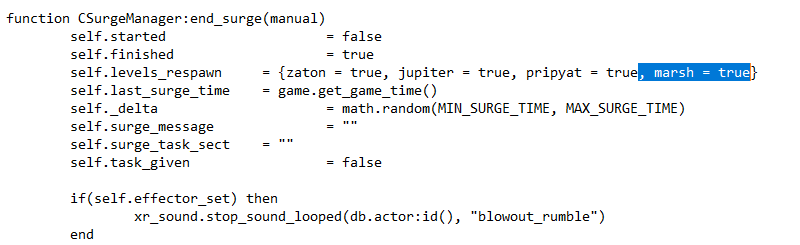
- Find the section labeled function
CSurgeManager:end_surge(manual)and input the name of your location. This way, when the emission ends, the trader will give the task to the technician to turn off the emission protection system.
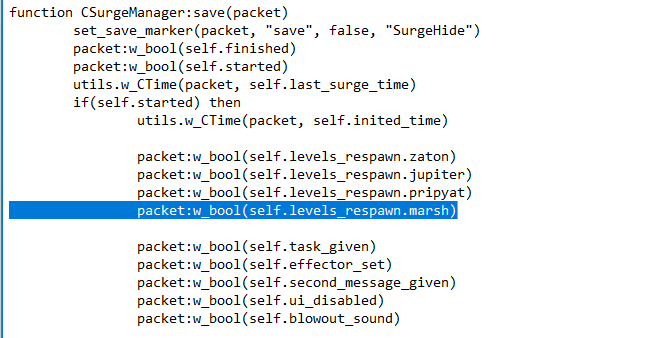
- Locate the section:
function CSurgeManager:save(packet), duplicate any existing entry, and insert the name of your location.
Feedback
Was this page helpful?
Glad to hear it! Please tell us how we can improve.
Sorry to hear that. Please tell us how we can improve.